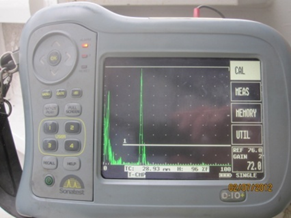
Ultrasonic Weld Testing
Surface and Sub-Surface – Ferrous/Non-Ferrous Metals
UT on welds on pipelines, structures, storage tanks and pressure vessel fabrications to the client’s specifications, international standards and acceptance criteria. Ultrasonic’s is used to test for subsurface defects in welds. A time base indication will require investigation and assessment by the trained technician.

Ultrasonic Testing
Ultrasonic Weld Testing
Ultrasonic Thickness Testing – Ferrous/Non-Ferrous Metals
Material thickness verification of material on pipelines, ship hull surveys, structures, storage tanks and pressure vessel fabrications. Verify any material thickness losses. Mapping of material loss areas, corrosion/erosion to clients specifications, international standards and acceptance criteria.

A time base indication
Ultrasonic Testing (UT)
Ultrasonic testing (UT) is a family of non-destructive testing techniques based on the propagation of ultrasonic waves in the object or material tested. In most common UT applications, very short ultrasonic pulse-waves with center frequencies ranging from 0.1-15 MHz, and occasionally up to 50 MHz, are transmitted into materials to detect internal flaws or to characterize materials. A common example is ultrasonic thickness measurement, which tests the thickness of the test object, for example, to monitor pipework corrosion.
Ultrasonic testing is often performed on steel and other metals and alloys, though it can also be used on concrete, wood and composites, albeit with less resolution. It is used in many industries including steel and aluminium construction, metallurgy, manufacturing, aerospace, automotive and other transportation sectors.
How it works
At a construction site, a technician tests a pipeline weld for defects using an ultrasonic phased array instrument. The scanner, which consists of a frame with magnetic wheels, holds the probe in contact with the pipe by a spring. The wet area is the ultrasonic couplant that allows the sound to pass into the pipe wall.
Non-destructive testing of a swing shaft showing spline cracking
In ultrasonic testing, an ultrasound transducer connected to a diagnostic machine is passed over the object being inspected. The transducer is typically separated from the test object by a couplant (such as oil) or by water, as in immersion testing. However, when ultrasonic testing is conducted with an Electromagnetic Acoustic Transducer (EMAT) the use of couplant is not required.
There are two methods of receiving the ultrasound waveform: reflection and attenuation. In reflection (or pulse-echo) mode, the transducer performs both the sending and the receiving of the pulsed waves as the “sound” is reflected back to the device. Reflected ultrasound comes from an interface, such as the back wall of the object or from an imperfection within the object. The diagnostic machine displays these results in the form of a signal with an amplitude representing the intensity of the reflection and the distance, representing the arrival time of the reflection. In attenuation (or through-transmission) mode, a transmitter sends ultrasound through one surface, and a separate receiver detects the amount that has reached it on another surface after traveling through the medium. Imperfections or other conditions in the space between the transmitter and receiver reduce the amount of sound transmitted, thus revealing their presence. Using the couplant increases the efficiency of the process by reducing the losses in the ultrasonic wave energy due to separation between the surfaces.
Features/Advantages
- High penetrating power, which allows the detection of flaws deep in the part.
- High sensitivity, permitting the detection of extremely small flaws.
- Only two nonparallel surfaces need to be accessible.
- Greater accuracy than other nondestructive methods in determining the depth of internal flaws and the thickness of parts with parallel surfaces.
- Some capability of estimating the size, orientation, shape and nature of defects.
- Non hazardous to operations or to nearby personnel and has no effect on equipment and materials in the vicinity.
- Capable of portable or highly automated operation.
- Results are immediate. Hence on the spot decisions can be made.
Disadvantages
- Manual operation requires careful attention by experienced technicians. The transducers alert to both normal structure of some materials, tolerable anomalies of other specimens (both termed “noise”) and to faults therein severe enough to compromise specimen integrity. These signals must be distinguished by a skilled technician, possibly requiring follow up with other nondestructive testing methods.
- Extensive technical knowledge is required for the development of inspection procedures.
- Parts that are rough, irregular in shape, very small or thin, or not homogeneous are difficult to inspect.
- Surface must be prepared by cleaning and removing loose scale, paint, etc., although paint that is properly bonded to a surface need not be removed.
- Couplants are needed to provide effective transfer of ultrasonic wave energy between transducers and parts being inspected unless a non-contact technique is used.
- Non-contact techniques include Laser and Electro Magnetic Acoustic Transducers (EMAT).
- Inspected items must be water resistant, when using water based couplants that do not contain rust inhibitors.
