Radiography Interpretation
Radiographic film interpretation of carbon and stainless steel welds and structures in accordance with the client’s specifications, international standards and acceptance criteria. Using X or gamma radiation that will create a permanent image that can be reviewed and stored.
Radiographic Testing (RT), or industrial radiography, is a nondestructive testing (NDT) method of inspecting materials for hidden flaws by using the ability of short wavelength electromagnetic radiation (high energy photons) to penetrate various materials.
Either an X-ray machine or a radioactive source, like Ir-192, Co-60, or in rarer cases Cs-137 are used in a X-ray computed tomography machine as a source of photons. Neutron radiographic testing (NR) is a variant of radiographic testing which uses neutrons instead of photons to penetrate materials. This can see very different things from X-rays, because neutrons can pass with ease through lead and steel but are stopped by plastics, water and oils. Most industries are moving from film based radiography to a digital sensor based radiography much the same way that traditional photography has made this move.
Since the amount of radiation emerging from the opposite side of the material can be detected and measured, variations in this amount (or intensity) of radiation are used to determine thickness or composition of material. Penetrating radiations are those restricted to that part of the electromagnetic spectrum of wavelength less than about 10 nanometres.
Inspection of welds
The beam of radiation must be directed to the middle of the section under examination and must be normal to the material surface at that point, except in special techniques where known defects are best revealed by a different alignment of the beam. The length of weld under examination for each exposure shall be such that the thickness of the material at the diagnostic extremities, measured in the direction of the incident beam, does not exceed the actual thickness at that point by more than 6%. The specimen to be inspected is placed between the source of radiation and the detecting device, usually the film in a light tight holder or cassette, and the radiation is allowed to penetrate the part for the required length of time to be adequately recorded.
The result is a two-dimensional projection of the part onto the film, producing a latent image of varying densities according to the amount of radiation reaching each area. It is known as a radio graph, as distinct from a photograph produced by light. Because film is cumulative in its response (the exposure increasing as it absorbs more radiation), relatively weak radiation can be detected by prolonging the exposure until the film can record an image that will be visible after development. The radiograph is examined as a negative, without printing as a positive as in photography. This is because, in printing, some of the detail is always lost and no useful purpose is served.
Before commencing a radiographic examination, it is always advisable to examine the component with one’s own eyes, to eliminate any possible external defects. If the surface of a weld is too irregular, it may be desirable to grind it to obtain a smooth finish, but this is likely to be limited to those cases in which the surface irregularities (which will be visible on the radio graph) may make detecting internal defects difficult.
After this visual examination, the operator will have a clear idea of the possibilities of access to the two faces of the weld, which is important both for the setting up of the equipment and for the choice of the most appropriate technique.
Defects such as delaminations and planar cracks are difficult to detect using radiography, particularly to the untrained eye.
Without overlooking the negatives of radiographic inspection, Radiography does hold many significant benefits over ultrasonics, particularly insomuch that as a ‘picture’ is produced, more accurate identification of the defect can be made, and by more interpreters. Very important as most construction standards permit some level of defect acceptance, depending on the type and size of the defect.
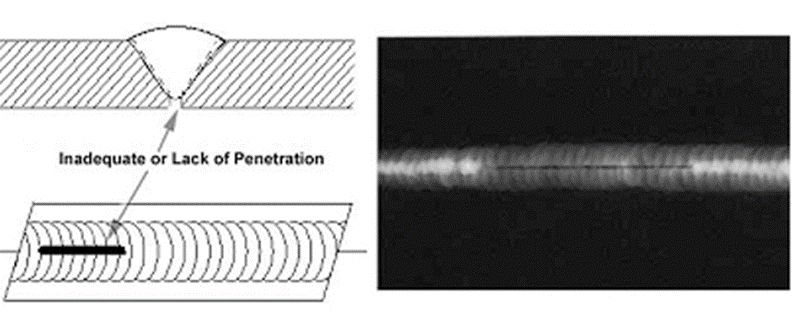
To the trained Radiographer, subtle variations in visible film density provide the technician the ability to not only accurately locate a defect, but identify its type, size and location; an interpretation that can be physically reviewed and confirmed by others, possibly eliminating the need for expensive and unnecessary repairs.

